You want a green, thick lawn that turns heads, right? A power seeder can make that happen faster than you think. Maybe you see bare spots or thin patches every time you step outside. It can feel frustrating. Good news: you can fix those rough areas and watch your lawn bounce back with simple steps.
Imagine your neighbors asking how you got such a vibrant yard. You can do it yourself!
Key Takeaways
Power seeders can quickly transform your lawn from patchy to lush. Expect to see thick, green grass in just a few weeks.
Follow a simple step-by-step guide for using a power seeder. Key steps include selecting the right seed, aerating the soil, and watering regularly.
Regular maintenance is crucial for a healthy lawn. Mow, aerate, and fertilize to keep your grass strong and vibrant.
Choose the right season for seeding. Cool-season grass thrives in late summer or early fall, while warm-season grass does best in late spring.
Document your lawn's progress with before and after pictures. This helps you appreciate the transformation and track improvements.
Power Seeder Results
Before and After Changes
You want to see a real difference in your yard. The before and after changes with a power seeder can surprise you. Many homeowners start with a lawn full of bare spots and thin grass. After using a seeder, you often see thick, green grass filling in those empty patches. The rows where you plant the seed show up quickly. You can watch new grass seed sprout in just a few days.
Here’s what you might notice after seeding:
Bare patches fill in with healthy grass.
The color of your lawn turns a deeper green.
The grass grows thicker and stands up taller.
Neighbors may even stop to ask what you did!
You do not have to wait long for results. Power seeding helps grass seed reach the soil at the right depth. This means you get high germination rates and fast growth. You can see the before and after difference in just a few weeks. Your lawn looks healthier and feels softer under your feet.
User Testimonials
You are not alone in wanting a better yard. Many people share their stories about using a power seeder. They talk about how easy it is and how fast they see results.
“Power seeding is efficient and fast. It delivers more timely results in terms of germination and new grass growth.”
You can feel proud when you see new grass seed popping up in those tough spots. Homeowners often say the change is easy to spot.
“Many homeowners quickly see the value when they see the results. There’s a visual component to it and you’ll actually see the planted rows. You’ll also see that new grass starts growing pretty soon after. Homeowners tell us it’s a good feeling when they start to see that new grass pop up…especially in those bare spots.”
You want a lawn that stays healthy, not just one that looks good for a week. Power seeding helps with that, too.
“Power seeding encourages new growth of grass seed that is less susceptible to weeds, disease and insects. So not only will your lawn look thicker, it will be healthier too.”
You can trust these before and after stories. The right seeder, the right seed, and a little effort can give you a lawn you love.
How Power Seeders Work
Slit Seeding Explained
You want your lawn to look its best. The secret starts with how you plant the grass seed. A power seeder uses a method called slit seeding. This process creates shallow, vertical slits in the soil. The machine drops the seed right into these slits. You get better seed-to-soil contact, which means your grass seed has a better chance to grow.
When you use slit seeding, you help the seed reach moisture and nutrients faster. The soil hugs the seed, so it does not dry out or blow away. You see more grass sprouting because the seeds get what they need to germinate. Your lawn fills in with thick, healthy grass instead of patchy spots.
Tip: Slit seeding works best when the soil is moist and the weather is just right. Warm days and cool nights help the grass seed grow strong. Fall is the ideal season for seeding because you get plenty of rainfall and mild temperatures.
Step-by-Step Guide
You do not need to be an expert to use a power seeder. You just need to follow a few simple steps. Here is a guide to help you get started with DIY lawn seeding:
Select Grass Seed
Pick a type of grass seed that matches your climate and yard conditions. You want a seed that will thrive in your area.
Consider Aeration
Aerate your lawn if the soil feels compacted. This step helps air and water reach the roots.
Clear Debris
Remove sticks, rocks, and leaves from your lawn. Clean ground helps the seeder work better.
Mow Grass
Cut your grass short before seeding. Short grass lets the seed reach the soil.
Mark Sprinkler Heads
Use flags or markers to show where sprinkler heads are. You do not want to hit them with the seeder.
Use the Power Seeder
Run the power seeder over your lawn. Move in straight lines and overlap each pass a little. The machine will cut slits and drop the seed at the right depth.
Fertilize and Water the Lawn
Spread fertilizer to feed your new grass. Water the lawn gently but often. Keep the soil moist until you see the grass seed sprout.
Safety First!
Wear sturdy shoes and gloves.
Check your yard for hazards before you start.
Make sure you know how to use the seeder.
Refuel only when the engine is cool.
Stay alert and avoid steep slopes.
Clean and store the machine safely when you finish.
You can transform your lawn with these steps. The power seeder makes the job easier and helps your grass seed grow faster. You get a thicker, greener lawn that feels soft under your feet.
DIY Lawn Seeding Stories
Case Study 1
You walk outside and see a patchy, tired lawn. You want a fresh start. You grab a power seeder and choose a cool-season grass seed. You test your soil and fix any compaction. You mow the grass short and clear away debris. You run the seeder in straight lines, making sure the seed goes deep. After a few weeks, you notice thick, green grass filling in the bare spots. Your renovation feels like the best solution for your yard.
Case Study 2
You move into a new home. The lawn looks thin and uneven. You want a healthy lawn for your family. You pick a warm-season grass seed and wait for late spring when the soil temperature reaches 65°F. You aerate the soil and select the best solution for your climate. You use the power seeder to plant the seed evenly. You water daily and watch the grass seed sprout. Your diy lawn seeding experience brings a lush, green lawn that stands out in the neighborhood.
Case Study 3
You face stubborn bare spots after a long, dry summer. You decide on a renovation using a power seeder and shade-tolerant grass seed. You follow these maintenance steps to keep your lawn healthy:
Water the soil every day for the first month, then switch to twice a week.
Start mowing when the grass reaches 3 inches, but only cut a third of the blade.
Use starter fertilizer and add nitrogen every four weeks.
Hold off on weed control until you mow 8 to 10 times.
Keep foot traffic off the new lawn for at least a month.
Give your lawn time to grow strong.
Your diy lawn seeding project pays off. You see a thick, healthy lawn that stays green and resists weeds.
Success Factors
You want the best results from your seeding project. Experts say these steps matter most:
Test and prepare your soil. Fix compaction and aerate for better seed growth.
Pick the right grass seed for your climate and yard needs.
Time your seeding for the right season. Cool-season grass does best in late summer or early fall. Warm-season grass likes late spring or early summer.
Use the right technique. Make sure the seed touches the soil and spreads evenly.
You can achieve a healthy lawn with the right preparation, timing, and care. Your renovation can be the best solution for a yard you love.
Lawn Improvement Tips
Common Outcomes
You want to see real changes after your diy lawn project. Most homeowners notice thicker grass and fewer bare spots. Your lawn looks greener and feels softer. You can walk outside and see a big difference in the overall quality. The soil holds moisture better, and the grass stands up taller. You might even hear compliments from neighbors who think you hired a professional.
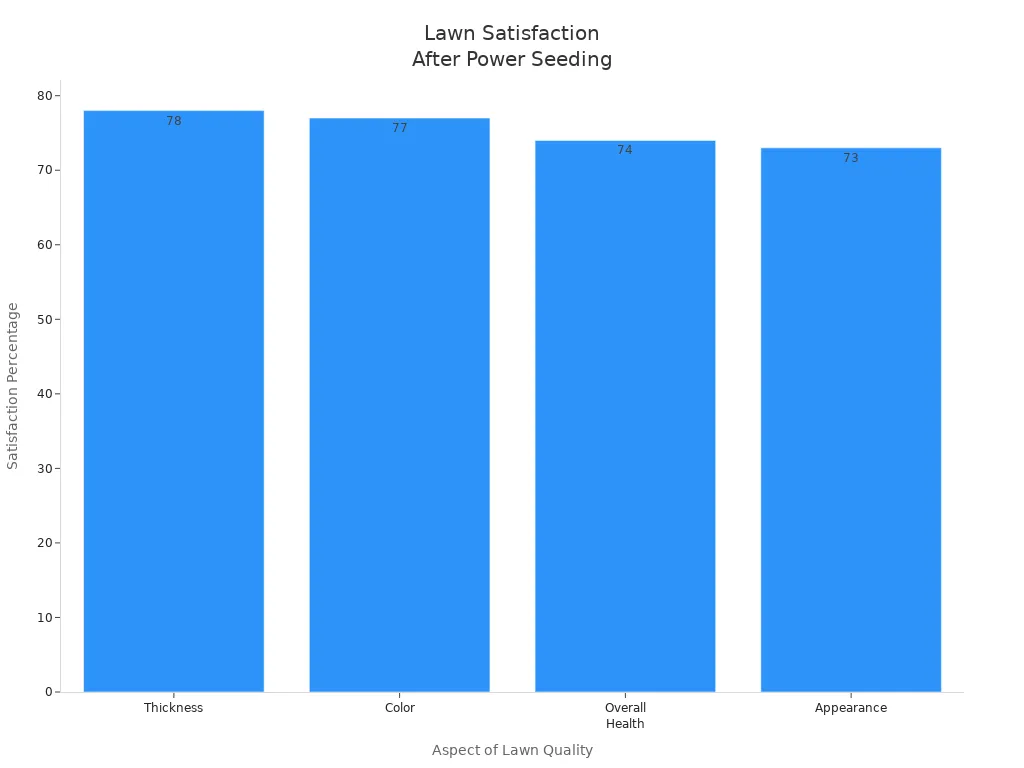
Check out these satisfaction rates from recent surveys. They show how people feel about their lawn after power seeding:
Aspect of Lawn Quality | Satisfaction Percentage |
Thickness | 78% |
Color | 77% |
Overall Health | 74% |
Appearance | 73% |
You can see that most people feel happy with the quality of their lawn after using high-quality seed and following diy steps. The soil gets healthier, and the grass grows stronger. You do not need to think about hiring a professional every time you want better results.
Maintenance Advice
You want your diy lawn to stay healthy and look great. Regular care helps you keep up the quality and avoid problems. Here are some tips for ongoing maintenance:
Mow your lawn and bag clippings so new seed can touch the soil.
Use an aerator after rain to break up compact soil and help roots grow.
Fertilize before seeding to give new grass the nutrients it needs.
Aerate at least once a year, especially in high-traffic areas.
Remove dead grass and debris to help seed reach the soil.
Water new seed two to four times daily for 5 to 10 minutes. Keep the top 1.5 inches of soil moist.
Water each morning for 10-20 minutes per zone to reduce evaporation.
Mist the soil lightly during dry spells to keep it damp but not soggy.
Tip: Using high-quality seed and proper fertilizer makes a big difference in lawn quality. You can skip hiring a professional if you follow these diy steps.
You can also try aeration and overseeding for even better results. Your soil will stay loose, and your lawn will look fresh all season. With regular diy care, you keep your lawn healthy and improve its quality year after year.
You can transform your lawn fast with a power seeder. High germination rates mean you see thick, green grass in weeks. For the best results, follow these steps: test your soil, prep the area, pick the right seed, and water on a schedule. Regular care keeps your grass healthy and strong. Power seeding saves money and helps your yard look great year after year. Give it a try—your neighbors will notice!
FAQ
Can I use power seeders if my lawn has lots of rocks?
You can use power seeders, but you should clear rocks first. Rocks can block the machine and mess up the seed rows. If you want good results, take pictures before and after to see the difference.
How soon will I see results after power seeding?
You usually see new grass in about 7 to 14 days. If you take pictures every week, you can track how fast your lawn changes. The pictures help you spot thick grass and fewer bare spots.
Do I need to water my lawn after using a power seeder?
Yes, you need to water your lawn often. Water helps seeds grow strong roots. If you take pictures after watering for a few days, you will notice greener grass and better coverage.
Should I take pictures before starting my lawn project?
Taking pictures before you start helps you see progress. You can compare the old lawn to the new one. Pictures also show where you need more seed or water.
Can I share my lawn transformation pictures online?
You can share your pictures on social media or with friends. People love seeing before and after pictures of lawn transformations. Your pictures might inspire someone else to try power seeding.